Weekly Fan Art Feature #2 – Vocaloid and Final Fantasy IX

This week’s fanart feature, is from an artist from New Zealand by the of name Kirsty. Her works consist of Vocaloid and video game fanart as well as others.

She uses Traditional and Digital Photoshop CS3 to create her fanart. To see more of her works visit her deviantart.

Vocaloid – SeeU
blue eye

Final Fantasy IX – Garnet and Zidane
chocobo

To have the chance for your works to be featured here please email us at miccostumesfanart [@] gmail.com with the following:

  • Your Name
  • Country.
  • Website [if desired]
  • Medium of work i.e. Pencil, Paint, Photoshop etc.
  • A maximum of 2 works attached in the email
  • The name of the anime/manga/video game it is from

Introducing the new weekly Fan Art Feature! #1

Hi everyone Mixiao here!

I’m happy to announce that Miccostumes’ Blog page will be featuring a new segment…[Drum roll please]… Weekly fanart features! Banzai!

There are many ways in which we show our love for our favourite Anime, Manga, Video games some include: cosplay, music videos, fanfics and of course fanart!

Here on the blog page, each week a certain amount of artists will be able to have the chance for their works to be featured in the Fanart blog. Of course we will also link your works to your webpage if you desire.

To have the chance for your works to be featured here please email us at miccostumesfanart@gmail.com with the following:

  • Your Name
  • Country
  • Website [if desired]
  • Medium of work i.e. Pencil, Paint, Photoshop etc.
  • A maximum of 2 works attached in the email
  • The name of the anime/manga/video game it is from

You will be notified via email if your work/s have been selected. You can email us with as many works as you like, however if you are selected for the feature, you will not be able to be featured again for 2 months. Please let others have the chance to share their talents too o(^O^)V

Important!

*Works must not include nudity, sexual references, violence, profanity etc.  as many readers may be under the legal age*

*Works must be done by you, please do not steal other’s and claim it as your own*

*Use of bases are allowed*

* Submitted works must be clear, please no blurry images*

Now to start off our 1st fanart feature!

Some readers out there may be familiar with my tutorials or have seen some of my cosplay accessories such as the Maid Headdress, Fairy Tail Whip,  Manga Hats, Vocaloid Magnet Headphones, Kingdom Hearts Wayfinder and more recently the Pandora Hearts Emily Doll. Well today I’m going to show you guys my 2D side^^ check out my other works at http://mixiao.deviantart.com/

The works below were drawn using a Graphics tablet and Adobe Flash CS4.

Kuroshitsuji – Sebastian and Ciel

seb n ciel

Pandora Hearts – Alice

alice

The second artist to be featured today goes by the name of Peter from Australia. His work is of a 3D rendering of Amane Misa from Death Note done in pencil on paper.

Death Note – Amane Misa

misa

How to make Emily the doll – Pandora Hearts Tutorial

No Break Xerxes cosplay is complete without his doll Emily! This tutorial will show you how to make a quick and cheap Emily doll which you can clip onto your clothes to complete the Break look.

Check out my other cosplay accessories at http://mixiao.deviantart.com/

What you need:

  • Foam Ball (my ball was 5-6cm diameter) – this will be the head of our doll.
  • Foam Bell shape – body – since Christmas  is coming up I’m sure you will be able to find a foam bell at craft stores.
  • Blue stretch fabric – has to stretch so our Emily’s Head doesn’t have creases on it.
  • Light pink fabric – not stretch, just regular cheap fabric.
  • Brown wool
  • Red ribbon
  • One sheet of Felt – any colour
  • 2 alligator clips
  • White and pink paint
  • Black fabric marker
  • Polyester stuffing
  • Hot glue
  • A thin wooden stick.

Steps:

  1. Using a pen/pencil/long pointed object, make a hole right though the foam ball. Make sure the hole goes directed though the centre of the ball and it is around 1cm in width. 
  2. Cut out a decent amount of blue stretch fabric enough to cover the whole ball and a little bit more.
  3. Wrap the fabric around the ball, tucking in the excess into the hole we just created. Make sure to not have many creases.
  4. Cut out many stands of the wool for hair, the lengths of the strands do not have to be the same. and tie all the stands together using one of the wool stands.
  5. Fold the hair together at the point where you tied a knot, put hot glue into one of the ends of the ball and place the folded part into the hole,  cut the top hair all the same length. (use a pencil to help push the hair in) should look like this:
  6. Cut out 2 pieces of 20cmx40cm from the pink fabric.  Lay both pieces on top of each other and sew the shorter sides.
  7. Fold in 1cm and iron this down to make a hem. Do this for both pieces but only for one side. The other side, fold in 2cm and iron down.
  8. Now sew the hems, for the 2cm side, leave a small gap, don’t close off the stitching.Thread ribbon through the 2cm hem. Now leave this aside.
  9. Grab your Emily head and wooden stick, put some hot glue into the other end of the head and place the wooden stick into the hole.
  10. Make a hole in your foam bell, pour hot glue into the hole and place the wooden stick with the head into the hole. Make sure the head sits nicely ontop of the bell. The stick does not have to be long as the bell, it can be shorter.
  11. Put hot glue onto the bottom of the foam bell and then place it on a sheet of felt. Cut off the excess.
  12. Cut out 4 15cmx4cm rectangles from the blue fabric. Place 2 pieces on top of each other and sew around(curve the ends for arms) and repeat for other arm. Stuff the arms with the toy stuffing and sew the ends off.
  13. Hot glue the 2 arms on the foam bell right under Emily’s head.
  14. Now for the bow. cut out a 10cmx8cm  rectangle, fold this in half (fold the 8cm side in half)and sew around, leaving a small gap, turn the rectangle inside out and iron it out. Cut out a 20cmx8cm rectangle, fold in half and sew it the same way. Cut out a small strip of the pink fabric 3cmx 4cm, hem the sides, fold this in half and sew the side opposite to the fold.[Image for steps below]
  15. Turn this inside out, and put the 2 pink strips you just sewed though it then thread though the back of the bow with some ribbon.
  16. NOW! here’s where it all comes together, Grab your bow, tied it around Emily’s neck and tie 2 knots at the back. Cut off excess ribbon. Place the pink “”skirt/dress” we made in step 8 over the ribbon knot but under the bow. Pull the dress’s ribbons together like a drawstring. Securely tie a knot, and cut off excess ribbon.
  17. Paint on 2 white circles for eyes, a pink creepy smile wait to dry and trace over the edges of these shape with your black fabric marker.
  18. Grab some of the red ribbon scraps, tie a bow on the top of Emily’s hair.
  19. Turn Emily upside down and hot glue the 2 alligator clips of opposite sides of the bell.

And we are done! There are lots of steps but it doesn’t take that long at all. I hope you enjoyed the tutorial!

How to make a Kingdom Hearts Birth By Sleep Wayfinder

bbs

IMG20110911_005
Check out my other works at my deviantart page

What you need:

  • Sculpey or any other brand of polymer clay
  • Clay tools, a range would be good. If you don’t know what i’m taking about have a look here
  • Stanley Knife or a knife you would not use for food again
  • Oven
  • Silver or grey Spray paint
  • Blue/Green/Orange/Yellow paint <- depending on which character’s wayfinder you’re making. Here I’m making Aqua’s
  • Metal wire
  • Pliers
  • This template – UPDATED

Steps

1) Print out the template provided and cut it out.

2) Get your sculpey and pull out 2 rows. Combine them together and roll out flat.

3) Place the template on the rolled sculpey and press down lightly.

4) Cut around the template with your knife.

5) Using your clay tools, indent into the sculpey the shape of the inside of the wayfinder. Don’t forget to leave a circular part at the bottom of each “shell” so the wire can go though.

IMG20110909_016

6) Poke a hole into each of the circular parts. Choose a shell to be the top one and poke a larger hole at the tip.

IMG20110909_017

7) Place the emblem on some scrap sculpey you rolled out before and cut around.

8 ) Draw on the extra lines in the emblem with a sharp pointed object and place it in the middle of your wayfinder.

IMG20110909_019

9) Put the sculpey into the oven to bake. Check the temperature and timing for your scupley, it should tell you on the packaging.

10) Take it out and let it rest and cool down for a while.

11) Grab your grey/silver spray paint and spray both sides of your wayfinder. Also make sure your sides are well covered.

12) Start painting the inside of each “shell”. I recommend starting with the tip of each shell as it is the lightest part, then paint the darkest, then blend together with a colour inbetween.

13) Cut an appropriate amount of wire and bend it the way staplers are shaped before it’s bent. Slot it through the 2 holes and bend them inwards at the back. Do this for all 5 Shells.

14) Your Wayfinder is complete.  The top hole is there for you to choose what you want to make your wayfinder into. Be it a key chain, necklace or whatever^^

IMG20110911_002
IMG20110911_008

How to make Vocaloid Magnet headphones

vocaloid magnet

headphones
What you need:

  • Plain head band. Preferably white but any colour will do.
  • Black lace or black and white ribbon.
  • Foam sheet. Colour of your choice.
  • Black cardboard
  • Craft glue
  • Hot glue
  • Craft wire or thin wire
  • Thin black ribbon
  • Black fabric
  • Interfacing
  • Polyester stuffing
  • Laminator and laminating sheets (if you don’t have a laminator you can still make the headphones, just skip the laminating steps)
  • Compass
  • Stanley knife
  • You will need to download this template as well: Wings and Circle Design

Steps:

1) Using hot glue, glue the black and white ribbon or lace over the headband and let it dry.

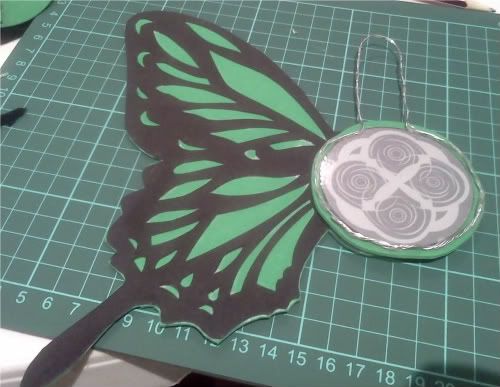
2) Print out the template for the wings and laminate it. This will make it a stronger stencil.

3) Using your stanely knife, cut out the template and trace it twice on black cardboard. Cut out the cardboard and using craft glue, glue it down on your foam sheet. NOTE make sure your wings are not facing the same direction, make sure you have a left, and a right wing.

4) Print out the template for the Circle Design and laminate it. Cut out the circles.

5) Using your compass measure a distance of 3.5cm and draw 2 circles on your foam sheet. Cut them out and glue on the circle designs, one design per foam circle. If you laminated the circle design, it’s best to hot glue it. if not, craft glue should work for unlaminated paper.

6) Using the same compass distance, draw 2 circles on interfacing and cut it out.

7) Cut out 4 squares from your black fabric, the squares should fit the interfacing circles with extra space around.

8 ) Iron on the interfacing circles onto a black fabric square each.

ironon

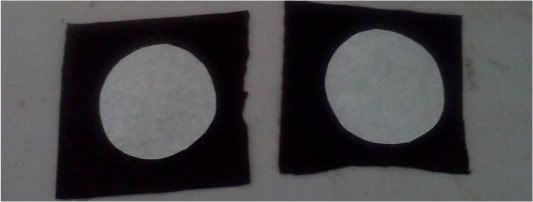
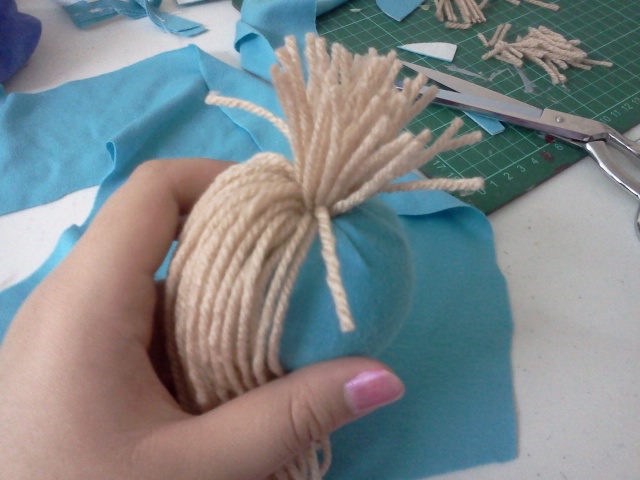
9) Place an interfaced square on top of another square without the interfacing and sew around the circle leaving a gap big enough to turn the circle inside out.

10) Trim off the excess fabric,leave a 1cm border around the sewing. Turn the circle inside out and stuff with polyester stuffing and sew down.

11) Repeat steps 9 and 10 for the other fabric square.

12) Grab a circle design and a wing, find the right spot you want it in and flip the two over, draw the outline on the circle where the wing and circle over lap. Then hot glue it down. Repeat for other wing.

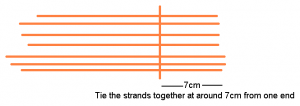
13) Cut off 50cm of craft wire, fold it in half and twist them together. Find the middle of the wire and place a thick marker in this spot. Bend the wire to make a U shape. Roughly 10cm from the tip of the U bend it off the 2 ends at a right angle in opposite directions, with remain wire curve it into a circle, the circle should be same size as your circle design. Twist together the remaining wire around the circle. Hot glue it onto your circle design. Repeat.

wings

14) Grab your headband and place it inside the circle roughly 2 – 2.5cm into the circle. Mark the overlapping spot, then hot glue it on. Do the same for the other side

11) Cut off 50cm of craft wire and again fold in half and twist. Using hot glue, glue thin black ribbon onto the wire. The wire should be sandwiched between 2 layers of ribbon. One on top and one below it.

15) Cut a small amount of black fabric and sew a small rectangle. This will be your microphone so make it small. Stuff it with polyester stuffing and place one end of the ribbonwire into the rectangle and seal it off with hot glue. (you can also glue a layer of the foam sheet on the bottom of the microphone to give it a bit of extra colour)

16) Glue down the other end of the ribboned wire on either side of you headphones, you should place it directly under the headband.

17) The last step is to glue the black circles you made before on the inside of your headphones, they should fit perfectly. It’s best to glue the interfaced side to the foam wings, that way it’s nice and soft for your ears.

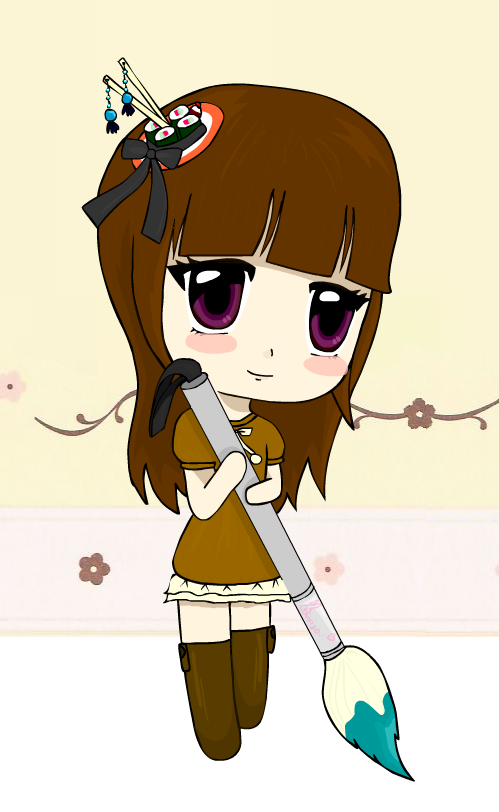
There we have it, Vocaloid Magnet headphones! Check out my other stuff at my deviantart page click here for my tutorials on How to make your own lolita maid headdress, Lucy Heartfilia’s whip from Fairy Tail or How to recycle your old manga into Lolita hats.

Thanks for reading! Feel free to comment on my page or here for any other tutorials you would like to see o(^0^)V