Cosplay as the Most Popular Blue-haired Anime Heroines

If you search online for blue-haired characters, you will get the results that they are usually characterized as “cool,” “intellectual,” “unrewarded,” and “low on luck.” And it seems that they’re mostly tragic roles in anime. But many of them are popular among fans. A recent poll conducted in Akihabara Japan from 100 people presents us the top blue-haired heroines:

1.

Rei Ayanami from Neon Genesis Evangelion

1

Rei Ayanami School Uniform

2


Rei Ayanami Fight Cosplay Costume plug suit


2.Sayaka Miki from Puella Magi Madoka Magica

3


3.Nymph from Heaven’s Lost Property

4


4.Ami Mizuno from Pretty Guardian Sailor Moon

5


5.Konata Izumi from Lucky Star

6


Konata Izumi blue school uniform

7


Konata Izumi red school uniform

6.Erio Touwa from Ground Control to Psychoelectric Girl

8

7.Ika Musume from Squid Girl

9

Choose your favorite one and cosplay as her to capture Otakus’ hearts~!

Cosplay Tutorial-How to make Psycho-Pass Dominator Prop

Guess you’re all familiar with the Dominator if you watch Psycho-Pass so I’ll save the introduction for it. Today we’re going to make one in mode of Non-Lethal Paralyser. Let’s have a look at the original design first.

0


Isn’t it cool and stunning?  o(≧v≦)o~~  Bet you’ll love it at first sight!


Materials

1. EVA (3mm, 5mm, 10mm)

2. Diode lamp beads and electric wire

3. Pen

4. Philip’s head screws (diameter 2mm)

5. Battery

6. Switch

7. Latex, propene and spray lacquer

8. Gloss oil


Data analysis

Before making it, we need to determine the size.

According to the proportion of a person and the Dominator, we can know that its length is about 34.5cm, its width is about 14.5cm and its thickness is about 3cm.


1

Since there’re many details, we can just use a software to draw the Dominator and then imprint on the EVA.

2

Process

1. For thickness 30mm, we divide it into 5+10+10+5 mm. Cut two 10mm EVA as the plates in the middle. It is ok that these two are not so accurate in size, later we’ll polish it according to the 5mm outside plates, so you can make them a bit bigger.

3

2.This is the most important step. Print the model picture and imprint it on the 5mm EVA with a pen. (Note: The lines must be fine and clear.) Then carve grooves along all the lines. Alternatively you can cut all the spare parts and then stick them one by one to the main body.

4

3. Carve out the parts for lamp beads, carve wire way along the wire. Connect the lamp beads, wire, the switch and the battery. Check if it works when you finish. You can use two more lamp beads at the head if you want the light to be brighter.

5

4.Draw the light dots on a transparency, color them blue and black. Not too thick either.

6

5. Stick all the parts together, plug in the screws and polish the edges. Apply white latex, propene, spray lacquer and gloss oil at last. Use paper to block the lights when paint.

7


The Cosplay Dominator’s done!  \(0^◇^0)/  Now let’s go out and shoot some criminals!

8

DIY Hoozuki Sama cellphone pendant step by step

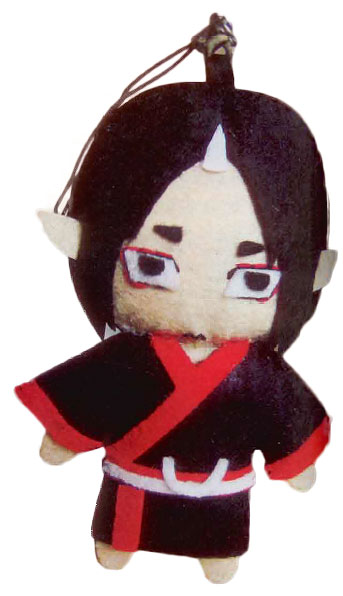
Most cosplayers or anime fans like to purchase some anime cellphone pendants,so today miccostumes want to share a tutorial to teach you how to make your own Hoozuki Sama cellphone pendant.(Click here if you want o get Hoozuki cosplay costume)

0


Material

1. Non-woven fabric (white, black, red, orange, green and skin color)

2. Thread (same as the non-woven fabric or similar)

3. Glue

4. Water-soluble pen

5. Some PP cotton

6. Phone strap and ribbon

7. Scissors

8. Ruler


Process

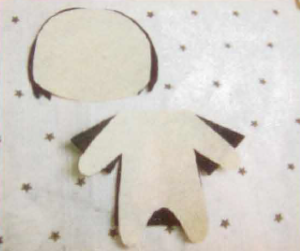
1. Draw all the sections with the water-soluble pen

① Head (two pieces about 4.5 x 5cm each)

② Ear (two pieces about 1.5 x 0.7cm each)

③ Hair (two pieces about 0.2-0.3cm bigger than the head)

④ Clothes (two pieces about 7.5 x 5cm each)

⑤ Body (two pieces about 6 x 6cm each)

1


Note: Make sure the hair is a bit bigger than the head and the clothes is a bit bigger than the body.

2


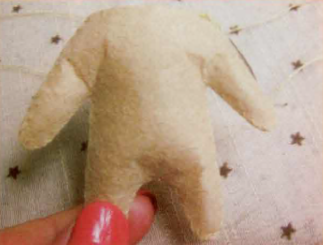
2. Sew the two body pieces together with skin color thread, fill in PP cotton at some point and then finish sewing.

3


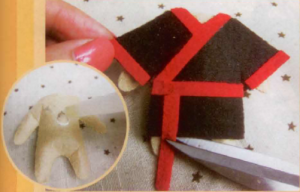
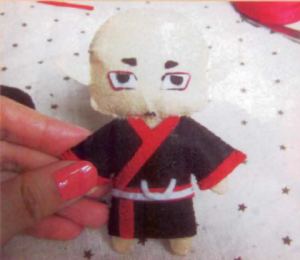
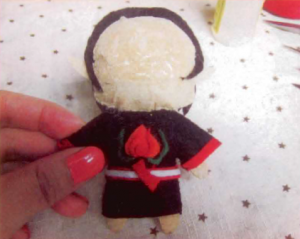
3. Spread glue on the body, stick the two clothes pieces together and then stick the accessories. Please cut off the extra parts.

4


4.Draw the details with the water-soluble pen, cut them off and then stick on with the glue.

5


6


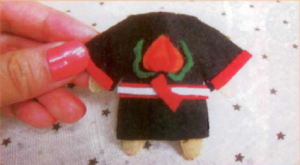
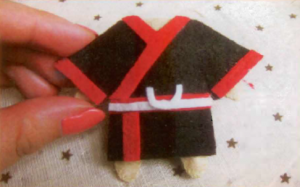
5. Sew the sides of the clothes with black thread.

7


Now the body part is finished.  Y(^_^)Y


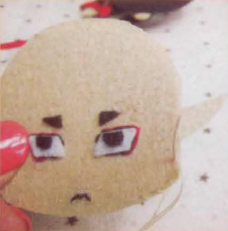
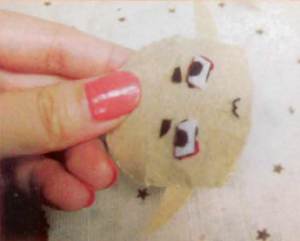
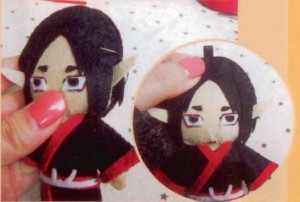
6. Draw the eyes and mouth on the head with the water-soluble pen. You can put the hair on the head (do not stick it now) to help you determine the locations of the eyes and mouth.

8


Now the body part is finished.  Y(^_^)Y


7. Cut off pieces of eyes and eyebrows and then stick them to the locations you drew. In order to highlight the eyes, sew around the eyes with black thread. Then sew around again with red thread to make it look more like Hoozuki.

Sew the mouth (shape of M) with black thread.

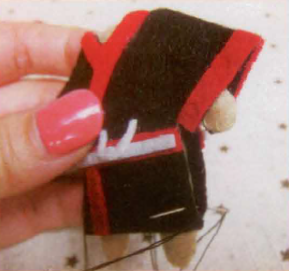
Sew the two head pieces together from the top to the bottom. Don’t forget to sew the ears.

9


8. Fill in PP cotton at some point but do not sew the jaw together.

10


9. Sew the head part and the body part together.

11


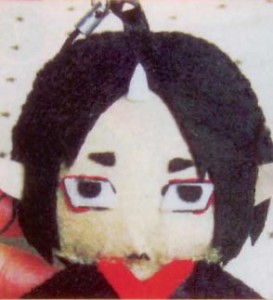
10. Stick the hair on the head with glue.

12


11. Sew the hair with black thread (only the part above the ears). Remember to sew a ribbon at the top for phone strap.

13


12. Last but not least, stick Hoozuki’s horn.

14


Congratulations~! You’ve got your own Hoozuki Sama now~! \(^o^)/


If you want to get more cosplay & anime accessories tutorials, please subscribe our blog or follow our facebook page and twitter 🙂


Sword Art Online – Silica’s Chest Plate Tutorial

sword-art-online-ep4-1-590x331

This is a step by step explanation of how I made my chest plate for the character Silica from the anime Sword Art Online. I used this method was an experimentation I did with Fimo air clay, it has worked really well and I’m here to share my process. There are many other ways to make amour such as using foam, wonderflex etc. but I find that foam tends to crinkle after a while and wonderflex is too pricy. However this method only works well if you have a mannequin that you can adjust the size to fit your measurements.

So what you need:

  • An adjustable dress mannequin and set it to your size
  • Fimo Air light clay. I used 2.5 packets for the front piece for a small build person and I suggest using 3-4 for larger built.
  • Cling wrap
  • Tougher plastic such as a large plastic bag
  • Rolling pin
  • Water spray
  • Container of water
  • Permanent marker
  • Utility knife
  • Sanding paper
  • Spray paint
  • Acrylic paint in a similar colour to the chest plate
  • A gloss or varnish. If not pva glue mixed with some water will work fine
  • Heaps of patience

The clay that I use is:

FIMO Air Light Packaging

STEPS:

  1. Wrap up your mannequin with cling wrap.
  2. Draw on the shape you want for the chest plate onto the plastic with the permanent marker.
  3. Cover a smooth flat surface such as a table or floor with cling wrap. Try to limit the amount of creases as possible as they will show up later.
  4. Open up the desired amount of packets you wish to use and try to mixed them all together first.
  5. Lay it out onto the covered area and try to flatten it is much as you can. This will make it easier for you later.
  6. Place the tougher plastic bag over the clay and use the rolling pin to flatten the clay into a rectangle strip that is slightly larger than the desired size of the chest plate.
  7. Remove the plastic bag and pick up the rolled clay with the bottom cling wrap.
  8. Place the clay facing down onto the dress mannequin so now the cling wrap should be facing towards you.
  9. Adjust the clay and mould it to the body.
  10. Try to remove as much excess clay as possible as it will help you later on. You can also use a water spray to help smooth over the surface with your hands.
  11. When you are happy with the shape and size, remove the plastic and let it dry for 24-48 hrs.
  12. After the time period has pasted gently remove the clay from the mannequin and let it dry on the inside for the same amount of time. Your chest plate should now be dry.20131127_112255
  13. Draw onto the chest plate the right shape with a marker and use a utility knife to cut off the excess. If you make a big mistake you can fix up the area by adding more clay and try to smooth it out as much as possible, let it dry and repeat the cutting process.20131127_115447
  14. Now onto the details. Use the marker and draw on the details you wish to add that come out from the chest plate.
  15. With the addition of the details keep a water spray and container nearby to help you smooth the surface. Pinch off large pieces of clay and roll it into a cylinder. Add these to the edges of your chest plate . Press it down and smooth it out as much as possible. If it does not stick dip the clay into water.20131127_123650
  16. Let it dry completely.
  17.  Once your chest plate is dry, use sanding paper to smooth over the surface.
  18. Now use a gloss or varnish to cover your whole piece. If you don’t have that PVA glue mixed with water will work as well. Let it dry.
  19. Paint the inside of the chest paint with a colour similar to the outside. Or if your clay is already that colour that is fine to leave it as it is.
  20. Finally use spray paint to coat the outside of the chest plate.silica


Cosplay Tips – Expanding Foam

554302_455365264517803_1245325082_n

Photography by George Wong

Vanille Cosplay by DanniTee

This is basic a tutorial on how to use expanding foam on props for those new to prop making or those who want to try out a new medium. Expanding foam is basically foam in a can. It is sprayed out and expands like its name suggests. A can of expanding foam is a very handy material to keep around for cosplayer just as handy as the hot glue gun.

For props that are more curved like such as Vanille’s weapon from Final Fantasy XIII and Soge King’s sling shot from One Piece it is best to use expanding foam for the main part. Expanding foam can be easily cut and carved to the desired shape with a simple cutting knife.

When you decide to use expanding foam as the main medium for your prop the first thing you need to do is draw and cut out your design on to a flat light weighted material such as foam board, corflute, thick cardboard [though thick card board may be difficult to cut normally].

TIP: Draw your design slightly thinner than what is desired. The expanding foam will add to this and make it larger.560867_10151155435742405_997300465_n


Once your piece is cut out, lay out some newspaper and spray the expanding foam over the design. Cover as much as you can but remember the foam will expand 3 times its original size. Only work on one side at a time. Don’t forget to wear gloves. Expanding foam is difficult to remove off skin if you do not act quickly.

TIP: Keep a bottle of nail polish remover nearby just in case you get some expanding foam on your skin. Nail polish remover will help remove expanding foam if you act quickly.

182386_10151155435762405_1805460605_n


It will take a couple of hours for it to harden but it is best to leave it over night. Once it is completely dried flip it over and spray the other side.

TIP: Lightly spray water over the whole thing. This will make the expanding foam harden faster. It will also give it a smoother surface than usual.

Once both sides have hardened use a utility knife and carve the bumps away for the desired shape. See below for a before and after shot.

224254_10151005795592405_697860244_n


TIP: If you are carving and suddenly see that inside is still gooey and honey-like stop immediately and let the foam completely dry. If you continue to pull away at the piece it will create massive holes.

You will notice that there are small holes all over the foam. If you want to cover these holes for a smooth finish, use another medium such as paper mache or paper clay and completely cover the whole piece. Both paper mache and paper clay can be smoothed out with sanding paper for an even more smooth finish. Once that is done, feel free to paint it over with acrylics, spray paint etc.